Creating a Blog on Your Shopify Site
How to Get Your Site in Search Engines - Blogs
Now that you have an Ecommerce site, how do you get people to visit it? Three simple words: Content, content, content. The content on your site should reflect your business and attract the visitor that is going to buy. Behind every website is a bunch of text (called metadata and metatags) that search engines search for to determine if your site meets the criteria that a person is searching for.
An entire industry has grown around promises of getting your site to the top of search engines, the gold standard of which is Google. You may have started receiving emails expressing how poorly your website is positioned in search engines and for a fee, ensuring your site has a high ranking in the Google. The good news is the SEO (search engine optimization) companies are finding you!
Realize that Google and other search engines want to display pertinent search results. SEO companies figure out the algorithm Google uses to determine the value of the site and set up sites to comply. Google then changes the algorithm because much of the content set up by the SEO companies is done to “beat the system” and results in low-quality sites being displayed. It’s a vicious cycle. Think back on the sites you visited over the years. Remember the boxes containing pertinent words (keywords) that displayed on front pages? Remember the sites that had a page containing links to other, in many cases, totally unrelated sites? These were all methods marketed as ways to improve your search engine optimization.
What it really comes down to is having good, pertinent content on your site that others want to not only visit but repost. Consider your site as the repository for your business musings, your advocacy, your promotions. And boy, if you can get other high-quality sites to link to blogs that you write, that’s money in the search engine optimization bank.
Writing Blogs on Your Site
Facebook has us conditioned that whenever we want to say something, write a post. But your post on your business Facebook page generally is displayed in a very small number of your fan’s news feeds. And then the post is never read again except for those few fans who actually visit your business page. In other words, your Facebook posts have a very short lifespan.
If you write a blog and store it on your Shopify site, you’ve created valuable content. Instead of relying on the reader to click the “More” button on your Facebook post, the Facebook post can be a short description of what you want to say and have a link to the blog page. If others find the blog compelling, they can link to it on Facebook, Twitter, or Pinterest. All roads lead back to your website.
Using the Blog Editor on Shopify
So now that you’re in the mentality that whatever you usually would post on Facebook should live longer than the blink of an eye, create a blog on your Shopify site and then post it on Facebook.
- From your Shopify Admin page, select the menu item “Online Store” and then “Blog Posts”. A page similar to this will display:

- Click on the words “First Post”. The following screen will display:

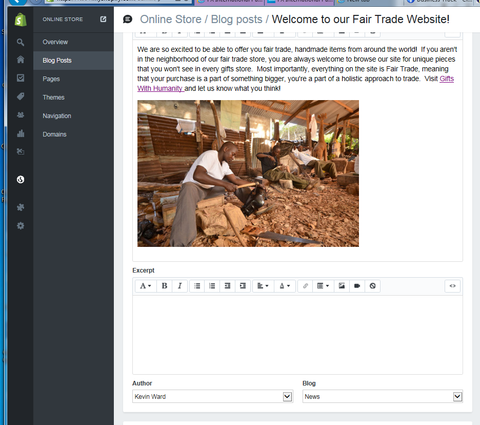
- You can delete this page, but I just typed over it. Here is the results of the edits:

I entered a compelling title in the Title field (it could be better – it should include the store name). In the Content field, I entered text, an image, and a link to the website.
Adding an Image to the Blog
To add an image to the blog, the image must exist on the Shopify site, in other words, it needs to be uploaded.
![]() Click on this button to add an image. You will have the option of inserting an image that already exists on the site or a product image from the site. If you click on the Upload button, you will be able to select a file from your computer to upload. Uploaded images will be available for you to insert into future blogs.
Click on this button to add an image. You will have the option of inserting an image that already exists on the site or a product image from the site. If you click on the Upload button, you will be able to select a file from your computer to upload. Uploaded images will be available for you to insert into future blogs.
Adding an Link to the Blog
![]() Click on this button to add a link (this can be to a product page or a collection, etc.) To add the link, highlight the text that you want to be clicked to go to the page and then click on the button. The following page will display:
Click on this button to add a link (this can be to a product page or a collection, etc.) To add the link, highlight the text that you want to be clicked to go to the page and then click on the button. The following page will display:

You can copy and paste the URL in the “Link To” field or type it with the http:// in front of it. Shopify even tells you that the “Link title” helps with SEO so enter something meaningful here. Change the “Open the link in” dropdown to “A New Window” so the person doesn’t leave your site when the link is clicked. Click on the “Insert Link” button. You will notice that the text you highlighted is underlined and a different color indicating it is a link and clickable.
Adding Search Engine Description Information
Let’s not forget that our purpose of writing the blog is 3-fold:
- Writing about topics that we believe others want to read
- Improve our search engine rankings with meaningful content
- Creating something that we can post that will get visitors to our site
The section below the post contains fields that are specifically for search engines. You have 70 characters for the title and 160 characters for the description (Meta description). Both of these will be picked up by search engines.
Saving, Viewing, Publishing
Once you’ve completed your post, click the “Save” button on the top right corner of the page. Then click “View” to admire your work.
You will want to check out any links that you entered (in this example, click on the words, Gifts With Humanity.)

Creating an Excerpt
We know this is only one of many posts you are going to write. When a viewer visits your blog page, you want them to be able to see a list of blogs rather than each blog in its entirety. So for each blog you write, you will want to create an excerpt.
- Click the “Add Excerpt” link (it’s above the Author box). The following screen will display:
- Copy the first part of your blog text (this will appear before the “Continue Reading” button on the list so you can write something different if you prefer.)
- Click the Save button and then View the blog.
- Click the menu item “Blog”. The following screen will display:

You can add an image to your excerpt. It can either be an image that already exists on the site (previously uploaded or a product image) or you can upload a new one.
- Click in front of the first word in the except text (in this case “We”) and click on the Table button.

- Select “Insert Table” from the dropdown options. The table will appear as a box above the text:


- Click in the table then click on the Image button. Select the image you want to be displayed with the excerpt. In this example, I selected a product image vs. an uploaded image. From the “Size” dropdown, you will want to select the size “Compact (160X160)”.

- Click the Insert Image button. Your excerpt should appear as below:

- Click the Table button again and select “Insert column after”. A second column will appear in the table, near the right side:

- Select the text below the table and cut it. Click in the newly created table column and paste. The table will automatically resize the columns.
- Click the Save button, view the blog post, and click the Blog menu item to see the Blog list:

Posting the Blog on Social Media
View your blog from the published page (not the Shopify admin page). Copy the URL. On your Facebook page, paste the URL into the post, wait until Facebook resolves the URL, then type over the URL text in the post with a comment about the post. If you’ve linked Twitter to Facebook, the post will be tweeted as well (and don’t forget hashtags!)

M Adams
December 10, 2015
Excellent Post! Great Tips! Great reference tool! Thank you!